Earlier this year, I started a new initiative here at Lumenbrite to try and establish a community of creative professional. This program is called Lumebrite Office Hours. During these online sessions, Lumenbrite Instructors will share a bit of their expertise by showcasing a feature, a concept or just something that is really cool they’ve learned with their experience in this creative industry. Attendees will have a chance to ask question about the topic or anything else that is troubling them.
In this session, I wanted to share a few things I’ve picked up while creating content in Premiere Pro, especially for social media. I don’t claim to be a social media expert or influencer, but I do make content. And when it comes to keeping up with platforms like Instagram, TikTok, YouTube, or whatever the next thing is—Premiere’s got some tools that are actually helpful once you know they’re there.
Check out the recording below of Social Media Editing with Premiere Pro.
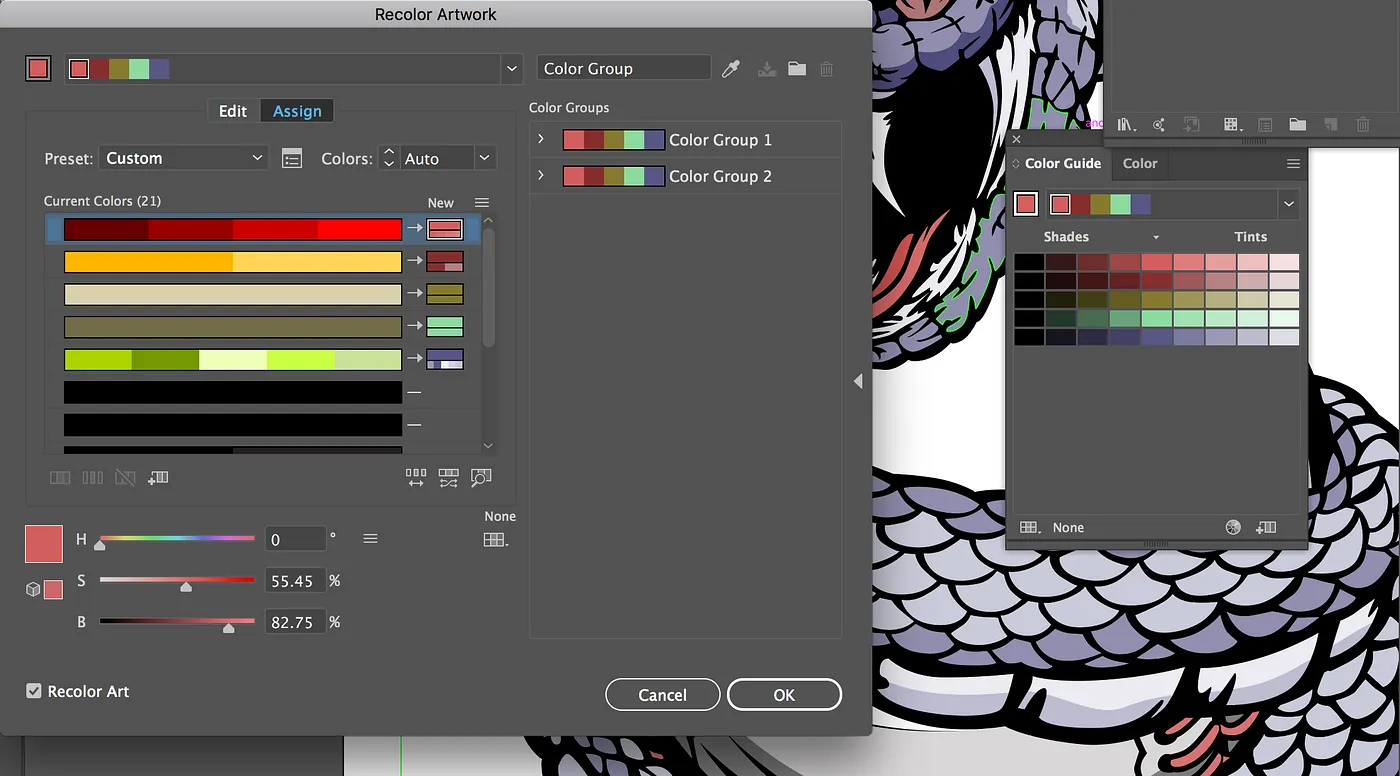
Adobe Illustrator has a myriad of tools for coloring artwork. In fact, it has more coloring features than any other program in the Creative Cloud.
In this short article, I cover a simple to use, but fully featured coloring tool with some very sophisticated (and maybe misunderstood) features. This tool is called the Recolor Artwork tool.
If you have an existing vector artwork file such as a logo or other graphic, you can easily recolor the art with ease and control. I have created a quick and to the point video tutorial that will show you how to use the Recolor Artwork tool. I don’t cover all of the features, but this tutorial will get you started and may be all you need to rapidly recolor artwork with a few clicks.
Preferences in Adobe Creative Cloud Apps allow you to customize how an app behaves and allows you to override defaults. Some preference setting changes are essential in speeding up your workflow when creating new documents.
I have created a short video tutorial that will show you how to create a preference setting and make it stick. I have focused on a few of my favorite preferences that include altering the following defaults:
Changing new document Units and Increments to Points or Inches (if you prefer)
Adding custom swatches to include your brand colors!
Changing the default font
Here are some additional tips to keep handy when customizing preferences:
To open the Preferences dialog box, choose Edit > Preferences (Windows) or Adobe InDesign > Preferences (Mac OS), and select the category of preferences you want to change.
In Adobe InDesign, preferences are created by closing all open documents and making changes to a feature of the program, including the preferences dialog box or the swatches panel, for example.
To restore default preference settings, hold down Alt (Windows) or Option (Mac OS) while the application is starting. You can release the Alt key or Option key when the splash screen appears.
To restore default preference settings and plug-in cache at the same time, hold down Shift-Alt (Windows) or Shift-Option (Mac OS) while the application is starting. Release the Shift-Alt keys or Shift-Option key when the splash screen appears.
Over the past few years I have taught training labs for web designers at Adobe MAX. This year (2019), I decided to go a bit deeper and introduce SASS in Bootstrap 4 to designers via Dreamweaver. Dreamweaver is geared up to be an all inclusive, one-stop web development application, but many of the more sophisticated features like SASS integration are a bit cloudy, so I created a video on how to install SASS. It is such a sexy, popular topic, I bet I’ll break YouTube.
Bootstrap 4 is great for rapid responsive web design and SASS is cool too. SASS comes integrated into Bootstrap but many designers forego the technical setup and stick to traditional CSS coding. Using Dreamweaver, which Adobe modernized a few years ago, is an easy way to slide into SASS development without having to use Node, gulp, terminal, CSS precompiling with external tools etc, etc. if you don’t want to. It is possible to get Dreamweaver setup to do all of this for you.
Get into SASS to unleash the fantastic power of all that Bootstrap has to offer including:
· Gradients, Shadows, Animation · Responsive Font Sizing · Variables, Mixins, etc. · Create Themes · Access special features of Bootstrap
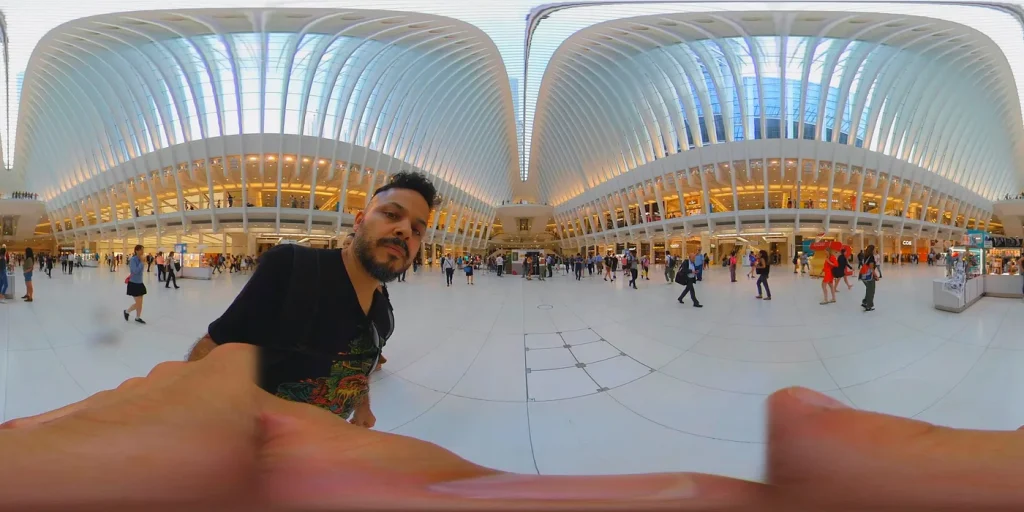
A 360 camera creates an equirectangular image that is hard to see in its regular form. Editing tools offer some kind of “VR view” so that you can see the video footage in a similar way that you’d see it on a VR headset. Adding titles and special video effects is challenging and the resources for learning how to manipulate this footage are scarce or just outdated, because the methods of working with 360 video are new and ever-changing.
360 Equirectangular Footage Taken with an Insta360 OneX Camera (lut applied)
I created a video tutorial that demonstrates how to work with 360 footage in Premiere Pro, add titles and utilize After Effects for more enhanced video treatments and motion graphics.
I also created a video that demonstrates how to use After Effects and its VR tool called the VR Comp Editor. I chose to demonstrate how to add multiple VR edits and apply 3D Camera Tracking to just a specific region of the footage.
The Adobe tools that allow you to manipulate VR footage work well, but I also recommend exploring Mocha Pro’s VR/360 features. Removing a moving dolly or adding a corner pin VR effect to footage is much easier and can be more accurate than using After Effects alone.
I understand that this is the tip of the iceberg, but I chose to create a few videos that I found less coverage for when editing 360 video in Premiere Pro and adding effects using After Effects. Hope this is useful and helps!
I believe all of the video editing tools mentioned in this article are fantastic. Some have better features than others, while some lack certain capabilities, but you can create amazing work with any of them if you know how to use them effectively. Pick the one you like and run with it. I have detailed these options, but this is not an exhaustive list. All of them include trials or free versions, so you can download and test them if you’d like.
Avid Media Composer is supposedly the choice for many feature films and TV productions. You can buy a subscription today for $259 per year. Available on PC or Mac.
Blackmagic DaVinci Resolve has both free and paid versions. The free version has some limitations, while the pro version costs $295 and includes a full suite of software for effects, color grading, audio, and more. Available on PC or Mac.
Apple Final Cut Pro is a polished editor with many solid, modern features. Available for Mac only at around $299.
Adobe Premiere Pro can be purchased as a standalone subscription or as part of the Adobe Creative Cloud, which includes flagship tools such as Photoshop, Illustrator, InDesign, After Effects, and many more apps. Prices range from $19.99 to $59.99 per month, depending on whether you are a student, teacher, or individual. Available on PC or Mac.
Vegas Pro is still around and looks pretty solid. It’s PC-only and not free, but costs just $199.
I have taught Avid Media Composer, was certified in Final Cut Pro back in the day, but now I primarily teach Premiere Pro. It is the most popular video editing tool that organizations seek training for. I really love DaVinci Resolve, but if I were starting out, I’d personally go with Premiere Pro since it comes with Creative Cloud, which most organizations need to purchase anyway.
I often get asked about mobile video apps like CapCut (which now has a desktop version as well), and I like those too, but they aren’t really viable in professional environments where you’re working with real cameras instead of a phone. I’m not hating on mobile devices—I love capturing candid shots with my iPhone during professional gigs. However, if you show up with a giant Alexa cinema camera with a DJI gimbal, people tend to act unnatural (or even scared). Just keep in mind that shooting in poorly lit environments will produce subpar or even unusable footage on a phone. If you’re shooting with your phone, try the Blackmagic Camera (for iPhone and Android). It’s better than your default camera app and allows you to easily use your phone as a pro device.
In my opinion, getting comfortable with a pro editing tool—like those mentioned in this article—is essential. Mobile apps are fleeting and don’t offer much in terms of longevity. Take the time to learn a professional tool, and you’ll be able to edit anything. If you’re on a tight budget, the free version of DaVinci Resolve is a great choice, but be mindful of its limitations. I appreciate the affordability and ingenuity of Blackmagic Design.
If you need additional apps like Photoshop, After Effects, and others, Premiere Pro is the best option since it comes as part of an all-in-one Creative Cloud subscription.
If you’re curious about which NLE video editing tool was used on a particular movie or show, you can look it up on Wikipedia—it usually lists the software used. I find it fascinating that some directors insist on specific software. Robert Rodriguez prefers Avid Media Composer, while David Fincher swears by Premiere Pro, and so on—at least, that’s what I’ve heard.